Length Gauges
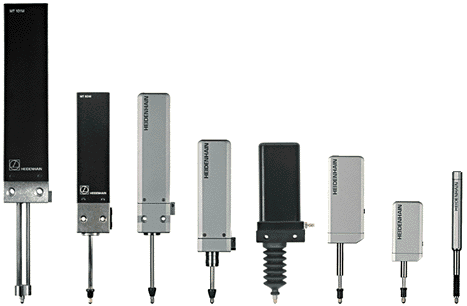
Incremental length gauges from HEIDENHAIN offer high accuracy over long measuring ranges. These sturdily made gauges are available in application-oriented versions.

They have a wide range of applications in production metrology, in multipoint inspection stations, measuring equipment monitoring, and as position measuring devices.
 
 
Search Result:
Type Incremental signals Recommended measuring step System accuracy
(at 19 to 21 °C)
Measuring range [mm]

PDF INFO

HEIDENHAIN-METRO MT 1201 11 µASS 0,1 µm/0,05 µm ± 0,2 µm 1 mounting instructions
HEIDENHAIN-METRO MT 1271 TTL   0,1 µm ± 0,2 µm 12 mounting instructions
HEIDENHAIN-METRO MT 1281 1 VSS 0,1 µm/0,05 µm ± 0,2 µm 12 mounting instructions
HEIDENHAIN-METRO MT 1287 1 VSS 0,1 µm/0,05 µm ± 0,2 µm 12 mounting instructions
HEIDENHAIN-SPECTO ST 1208 11 µASS 1 µm/0.5 µm ± 1 µm 12 mounting instructions
HEIDENHAIN-SPECTO ST 1278 TTL   1 µm/0.5 µm ± 1 µm 12 mounting instructions
HEIDENHAIN-SPECTO ST 1288 1 VSS 1 µm/0.5 µm ± 1 µm 12 mounting instructions
HEIDENHAIN-SPECTO ST 1207 11 µASS 1 µm/0.5 µm ± 1 µm 12 mounting instructions
HEIDENHAIN-SPECTO ST 1277 TTL   1 µm/0.5 µm ± 1 µm 12 mounting instructions
HEIDENHAIN-SPECTO ST 1287 1 VSS 1 µm/0.5 µm ± 1 µm 12 mounting instructions
HEIDENHAIN-CERTO CT 2501 11 µASS 0,1 µm/0,05 µm ± 0.1 µm without compensation;
± 0.03 µm after linear length error compensation
25  
HEIDENHAIN-CERTO CT 2502 11 µASS   ± 0.1 µm without compensation;
± 0.03 µm after linear length error compensation
25  
HEIDENHAIN-METRO MT 2501 11 µASS 0,1 µm/0,05 µm ± 0,2 µm 25 mounting instructions
HEIDENHAIN-METRO MT 2571 TTL   0,1 µm/0,05 µm ± 0,2 µm 25 mounting instructions
HEIDENHAIN-METRO MT 2581 1 VSS 0,1 µm/0,05 µm ± 0,2 µm 25 mounting instructions
HEIDENHAIN-METRO MT 2587 1 VSS 0,1 µm/0,05 µm ± 0,2 µm 25 mounting instructions
HEIDENHAIN-SPECTO ST 3008 11 µASS 1 µm/0.5 µm ± 1 µm 30 mounting instructions
HEIDENHAIN-SPECTO ST 3078 TTL   1 µm/0.5 µm ± 1 µm 30 mounting instructions
HEIDENHAIN-SPECTO ST 3088 1 VSS 1 µm/0.5 µm ± 1 µm 30 mounting instructions
HEIDENHAIN-SPECTO ST 3007 11 µASS   ± 1 µm 30 mounting instructions
HEIDENHAIN-SPECTO ST 3077 TTL   1 µm/0.5 µm ± 1 µm 30 mounting instructions
HEIDENHAIN-SPECTO ST 3087 1 VSS 1 µm/0.5 µm ± 1 µm 30 mounting instructions
HEIDENHAIN-CERTO CT 6001 11 µASS   ± 0.1 µm without compensation;
± 0.05 µm after linear length error compensation
60  
HEIDENHAIN-CERTO CT 6002 11 µASS   ± 0.1 µm without compensation;
± 0.05 µm after linear length error compensation
60  
HEIDENHAIN-METRO MT 60M 11 µASS   ± 0,5 µm 60  
HEIDENHAIN-METRO MT 60K 11 µASS   ± 0,5 µm 60  
HEIDENHAIN-METRO MT 101M 11 µASS   ± 1 µm 100  
HEIDENHAIN-METRO MT 101K 11 µASS   ± 1 µm 100  


Length gauges are distinguished by high accuracy in the submicron range. The Heidenhain -METRO  series of length gauges (accuracy grades ± 0.2 µm, ± 0.5 µm and ± 1 µm) are used for precision measurements in laboratories, for vendor inspection and similar tasks, or as position displays for X-Y tables.

Length gauges from the
CERTO series provide accuracy grades of ± 0.1 µm and better. These devices are suited for such tasks as gauge-block calibration, but also for the production inspection of high-precision parts.

Length gauges from the
SPECTO series provide an accuracy of ± 1 µm.
SPECTO's compact dimensions make it attractive for use in multipoint inspection devices.


SPECTO
 
  ST 12
System accuracy ± 1 µm
Measuring range 12 mm (0.47 in.)
Output signals
ST 1201:  11 µAPP Signal period 20 µm
ST 1271:  TTL Signal period 2 µm
Recommended meas. step 0.5 µm
Plunger actuation Plunger extended by spring (= rest position)
Protection (IEC 529) IP 64

ST 12

Incremental length gauge for multipoint inspection apparatus. Measuring range 12 mm, i.e.:

Simpler design of inspection devices, with one device for several masters
Simpler masters due to comparative measurements

SPECTO's innovative design enables it to provide stable measurements over longer periods of time. SPECTO length gauges are free of drift and need no readjustment.

Output signals:

 
ST 1201  11 µAPP Signal period 20 µm
ST 1271  TTL Signal period 2 µm


High-Accuracy Length Gauges

 
HEIDENHAIN-METRO
 
Measuring Ranges 12 and 25 mm
  MT 12
MT 25
MT 12P
MT 25P
MT 12W
MT 25W
System accuracy ± 0.2 µm ± 0.5 µm ± 1 µm
Measuring range MT 12..: 12 mm (0.47 in.)
MT 25..: 25 mm (1.0 in.)
Recommended meas. step 0.05 µm 0.1 µm
Plunger actuation Cable lifter
or spring loaded
Pneumatic Pneumatic
or spring loaded
Protection (IEC 529) IP 50 IP 64 (for
plunger IP 50)
IP 64


Measuring Ranges 60 and 100 mm
  MT 60M
MT 60K
MT 101M
MT 101K
System accuracy ± 0.5 µm ± 1 µm
Measuring range 60 mm (2.4 in.) 100 mm (3.94 in.)
Recommended meas. step 0.1 µm
Plunger actuation MT 60M: Motor
MT 60K: Coupling
MT 101M: Motor
MT 101K: Coupling
Protection (IEC 529) IP 50 IP 50

MT 12

 
MT 12:
Rugged standard version with ball-guided plunger for radial forces up to 0.8 N; Plunger actuation by cable lifter or contact.


Output signals:
MT 1281  1 VPP Signal period 2 µm
MT 1201  11 µAPP Signal period 2 µm
MT 1271  TTL Signal period 0.4 µm or 0.2 µm

MT 25

 
MT 25:
Rugged standard version like MT 12, but for measuring ranges up to 25 mm (1 in.)


Output signals:
MT 2581  1 VPP Signal period 2 µm
MT 2501  11 µAPP Signal period 2 µm
MT 2571  TTL Signal period 0.4 µm or 0.2 µm

MT 12P and MT 25P

 
MT 12P and MT 25P:
With pneumatic plunger activation

Output signals: 
 11 µAPP    Signal period 10 µm

MT 12P

MT 25P

MT 12W and MT 25W

 
MT 12W and MT 25W:
Dust and splash protected version (IP 64)

Output signals: 
 11 µAPP    Signal period 10 µm

MT 12W

MT 25W

MT 60M and MT 60K

 
MT 60M:
Motorized plunger actuation; constant gauging force, variable with three stages

MT 60K
:
Free-moving plunger for connection to moving elements by coupling

Output signals: 
 11 µAPP    Signal period 10 µm

MT 101M and MT 101K

 
MT 101M:
Motorized plunger actuation; constant gauging force

MT 101K
:
Free-moving plunger for connection to moving elements by coupling;
for applications with high radial forces up to 2 N

Output signals: 
 11 µAPP    Signal period 10 µm


Length Gauges with Very High Accuracy

CERTO
 
  CT 60 Length Gauge CT 25 Length Gauge
Measuring standard DIADUR phase grating on Zerodur® glass ceramic
Coefficient of linear expansion
atherm= (0 ± 0.1) ppm/K
Grating period 4 µm
Output signals   11 µAPP    Signal period 2 µm
System accuracy* ± 0.1 µm
± 0.05 µm with length error compensation in the ND 281 display unit
± 0.1 µm
± 0.03 µm with length error compensation in the ND 281 display unit
Measuring range 60 mm (2.4 in.) 25 mm (1.0 in.)
* at 19 to 21 °C; permissible temperature fluctuations during measurement: ± 0.1 K

CT 60


The CERTO CT 60 Length Gauge features a measuring range of 60 mm. It is used for incorporation into special measuring apparatus, calibrating and inspecting devices or special purpose machines, for example in conjunction with the monitoring and control of assembly and adjustment procedures.

A CERTO length gauging system comprises:

CT 60 Length Gauge,
ND 281 Display Unit
Control box
Gauge stand
Ceramic suction plate as support surface


Accuracy
The total error of the CT 60 over the entire measuring range of 60 mm lies within ± 0.1 µm at ambient temperatures between 19 and 21 °C and with temperature fluctuations of ± 0.1 K during measurement.

When the CERTO is used with length error compensation, e.g., in conjunction with the
ND 281 Display Unit, HEIDENHAIN guarantees a total error of ± 0.05 µm over the 60 mm measuring range.

CT 25


The CERTO CT 25 Length Gauge features a measuring range of 25 mm.

The high accuracy and measuring steps of 10 nm and less permit use of the CT 25 in gauge block calibration. Thanks to its generous measuring range — much larger than with inductive length gauges — the number of reference standard blocks required can be reduced significantly.


Accuracy
The total error of the CT 25 over the entire measuring range of 25 mm lies within ± 0.1 µm at ambient temperatures between 19 and 21 °C and with temperature fluctuations of ± 0.1 K during measurement.

When the CERTO is used with length error compensation, e.g., in conjunction with the
ND 281 Display Unit, HEIDENHAIN guarantees a total error of ± 0.03 µm over the 25 mm measuring range.